
Learn more about the Dentsply Sirona Windows 11 Security Package to continue ensuring security and compatibility of your Dentsply Sirona devices.
Blog Post
Restorative
The importance of provisional restoration excellence cannot be underestimated.
Here, we’ll walk through how to make the process efficient, leverage your assistant, and offer practical solutions that enhance results and efficiency.
Role of a provisional
Fundamentally, the provisional takes the place of missing dental hard tissue. The provisional must fulfil several requirements while waiting for delivery of the final crown:
- Space maintenance – preventing tilting/drifting of adjacent teeth and movement of opposing teeth.
- Function – enabling usual eating and drinking, with the provisional tolerating functional loads.
- Protection – preventing damage to the preparation, including the enamel margins, and protecting exposed dentin in vital teeth against sensitivity.
- Soft tissue – preserving gingival contours and preventing gingival irritation and food impaction associated with gaps. Should crown lengthening be required prior to tooth preparation, a provisional helps to contour the soft tissue during the healing phase.
- Esthetics – the contour, shade and position should match the dentition, and the gingival contour should look natural. Provisionals are also used to develop peri-implant soft tissue for an esthetic restorative emergence profile for implant-supported crowns.
Maintaining fit, form and function efficiently
Provisionals must maintain fit, form and function requirements as an interim solution prior to delivering definitive restorations. The more streamlined and efficient the process, the better.
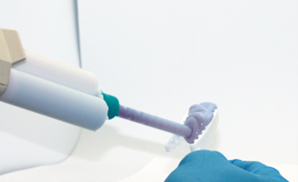
That’s where chairside custom fabrication of the provisional using a matrix (dental impression) comes in. The basic steps are as follows:
- Take an impression prior to tooth preparation, provided the tooth’s contour is suitable as a template. Areas of missing contour can be recreated (e.g., with a core build-up/composite material or a cement depending on location and extent) prior to taking the impression.
- Following tooth preparation, place the provisional material in the matrix at the location of the prepped tooth. Don’t overfill or underfill the area – too much material will necessitate more trimming, too little will cause voids in the provisional.
- A thin layer of water-soluble lubricating medium may be applied to the tooth. The matrix will define the external contours of the provisional.
- After the recommended self-curing time, remove the matrix and provisional.
- If the provisional material is dual cure, light-curing is performed after removal in accordance with the manufacturer’s instructions for use.
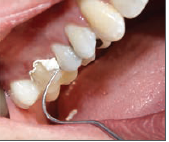
- Trim away excess, then finish and polish the provisional.
- Interim check for contour, fit, and function prior to cementation.
- Cement the provisional and promptly remove excess cement once set.
- Recheck the occlusion and function of the provisional.
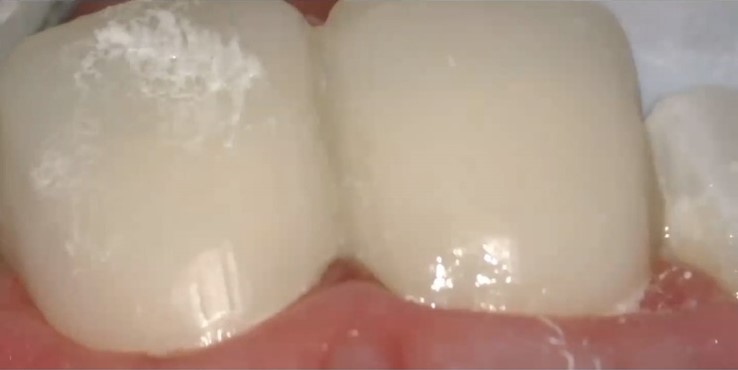
Temporary cementation of provisional restorations.
Images courtesy of Alan M. Atlas, DMD
This method offers efficient delivery of a custom provisional. There’s no need for a separate visit and while stock pre-fabricated provisionals are available, these can fit poorly, offer poor esthetics, and often require time-consuming adjustments.
Implications of various challenges
A poorly-fitting/lost provisional can cause inadequate space maintenance and result in the final restoration being too large for the remaining space. Another potential outcome is chipped enamel margins that cause gaps at the margins of definitive restorations. Both are examples of why it is imperative that inadequate provisionals be avoided and lost ones are rapidly replaced.
Errors that can cause loss of the provisional include:
- Poor form and function overall
- A poor-fitting inner surface
- Using a provisional material with insufficient strength
- Poor cement selection
- Poor technique
Provisional restorations may be ‘temporary’, but a poor fit/lost provisional causes frustration and has a negative impact on practice efficiency, function, esthetics, patient comfort and satisfaction, and ultimately on practice profitability.
Why alginate alternatives are ideal preliminary matrix materials
Historically, alginate impressions have been used as preliminary matrix materials. However, their rough surface means more time spent finishing and polishing a provisional. In addition, since set alginate is not dimensionally stable, it is usually impossible to use the matrix for a second provisional should that be needed.
Today, alginate alternatives/Vinyl Polysiloxane (VPS) are available and provide a smooth surface when set, improving the surface texture and esthetics of provisionals. The matrix is also dimensionally stable for some time allowing the matrix to be re-used for a second provisional if necessary.
Leveraging assistants to fabricate provisionals
Delegating all or some stages of fabricating a provisional to dental assistants leverages their time, freeing the dentist up for other tasks. Depending on the procedures permissible under your State Dental Practice Act for DA/RDA/EFDA, dental assistants can perform intra-oral fabrication, extra-oral trimming, finishing and polishing, and/or cementation and removal of excess cement. Where permitted, each step delegated to assistants can increase practice efficiency.
Fabricate a Well-fitting Provisional Efficiently with Help from Dentsply Sirona
Choosing to use an alginate alternative saves time chairside and streamlines the process. Dentsply Sirona’s Algin.X™ Ultra is the ideal alginate alternative, offering:
- High accuracy and detail
- Adjustability for increased flexibility
- Long-term stability
The adjustability of Algin.X™ Ultra material means it can be shaped and adjusted and long-term stability allows the matrix to be stored as a record and used for up to two weeks for fabrication of a second provisional if needed. Less is definitely more when it comes to mess, and with Algin.X™ Ultra material’s automix feature, a smooth accurate mix is delivered straight into the tray, with no hand mixing or messy clean-up.
A temporary crown material must have strength, durability, and esthetics. Integrity® Multi-Cure Temporary Crown and Bridge Material excels at this. It is easy-to-use, and available in multiple shades with fluorescence and high polishability for excellent esthetics. As a dual-cure material, the initial strength following intraoral self-cure is increased by on-demand light curing chairside, while shrinkage is minimal. Light-curing saves up to 30% in procedure time by allowing for immediate trimming and finishing and faster placement.*
Integrity® Multi-Cure material also bonds to itself for easy repair. Integrity® TempGrip® Temporary Crown & Bridge Cement is the perfect choice for cementing the provisional. After automixing, the texture is creamy with a low film thickness for seating, and after setting, excess cement peels away easily without crumbling. Add to this adequate strength for secure provisionals yet easy removal with the cement remaining in the provisional.
With a portfolio of excellent materials for the fabrication of provisionals, we want to support you further with Dentsply Sirona’s entire online Dental Academy complete with webinars, how-to videos, and real-world examples on how to create streamlined solutions with efficient procedures and even greater patient satisfaction.
Contact us now and let’s get started!
The information provided herein, does not, and is not intended in any way to, constitute legal advice; Instead, all information, content and materials available are for general informational purposes only.
References
Wassell, R., St. George, G., Ingledew, R. et al. Crowns and other extra-coronal restorations: Provisional restorations. Br Dent J 192, 619–630 (2002). https://doi.org/10.1038/sj.bdj.4801443
Astudillo-Rubio D, Delgado-Gaete A, Bellot-Arcís C, Montiel-Company JM, Pascual-Moscardó A, et al. (2018) Mechanical properties of provisional dental materials: A systematic review and meta-analysis. PLOS ONE 13(4): e0196264. https://doi.org/10.1371/journal.pone.0196264
