
Contact us
Find the products your practice needs to succeed.
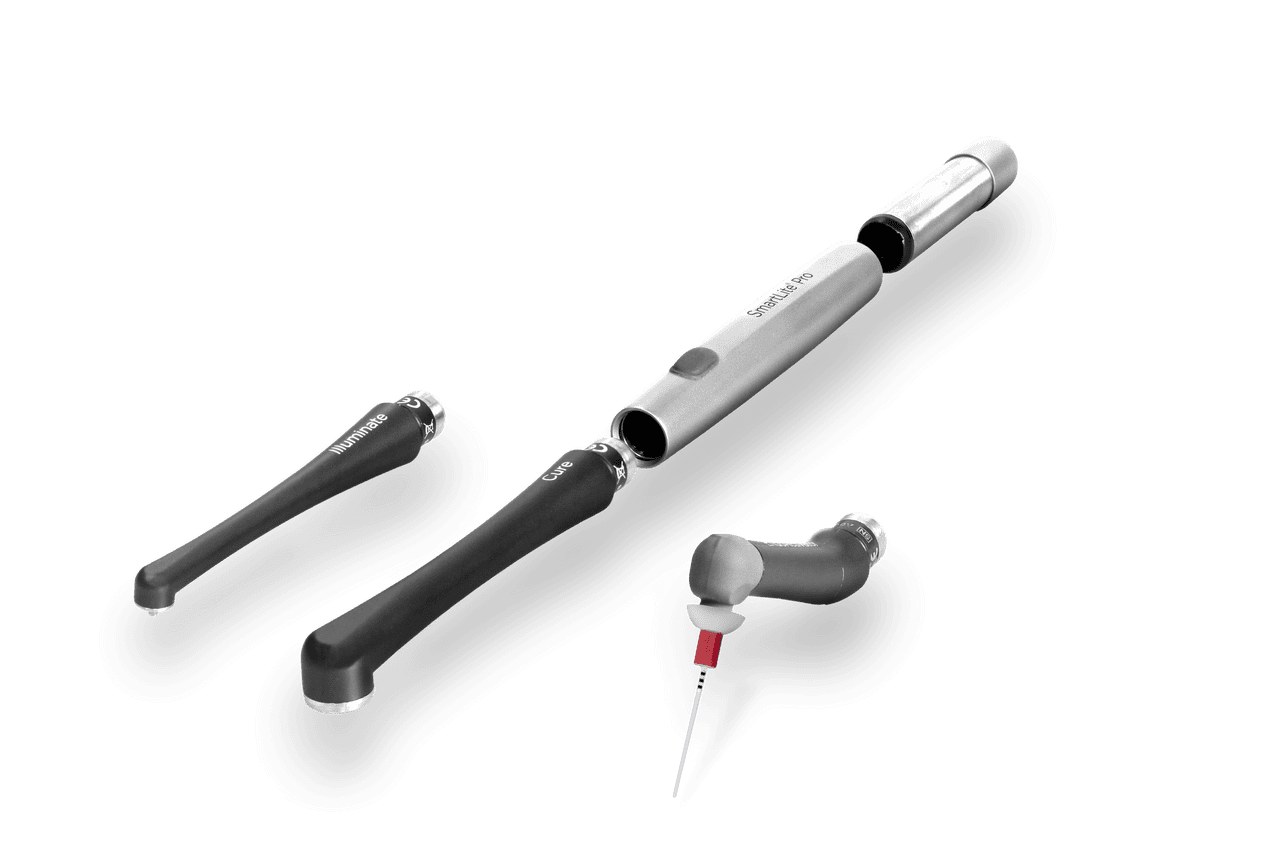
Bring innovation to your practice with SmartLite® Pro.
More Than a Dental Curing Light
Introducing the SmartLite® Pro modular LED curing light, one of the simplest and most versatile dental instruments you will ever own. Allowing you to seamlessly move from one workflow to another.
While it is best known for leading quality of cure, it features a unique modular design with interchangeable tips for a variety of clinical indications. The specially designed transillumination tip is a diagnostic tool to visualize caries, fractures and rootcanals. And now, the multi-directional movement of the SmartLite Pro EndoActivator™ for effective irrigant activation. SmartLite® Pro's pioneering design also accomodates the addition of future tips as dental technology advances.
Plus, if you’re looking for longevity, the all-metal housing provides robust performance year after year.
Benefits
Why choose SmartLite® Pro?


Reliable Clinical Outcomes
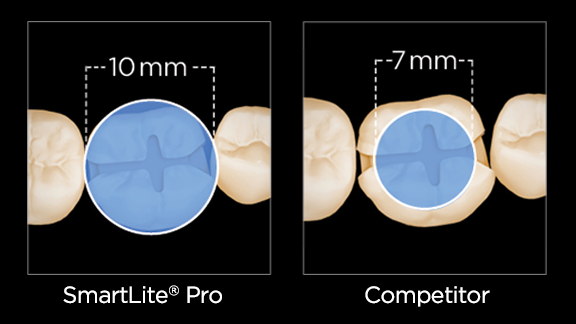
Large 10 mm active curing diameter to cover bigger restorations combined with an excellent beam collimation for reliable curing even over larger distances
State of the Art Optics
Optimized 4 LED design provides a homogeneous light distribution over the entire active curing area
Form
Remarkable pen-style design that feels balanced in the hand and beautiful in its details
Modular Concept
Features a modular concept with interchangeable tips for a variety of clinical indications
Function
Forward-thinking composition of clinical performance and modular versatility
Features
Endless Possibilities with SmartLite® Pro's Modular Concept
Remarkable Design
Even before you pick up SmartLite® Pro and get to work, the entire system is crafted for optimal dental workflows and predictable clinical outcomes:
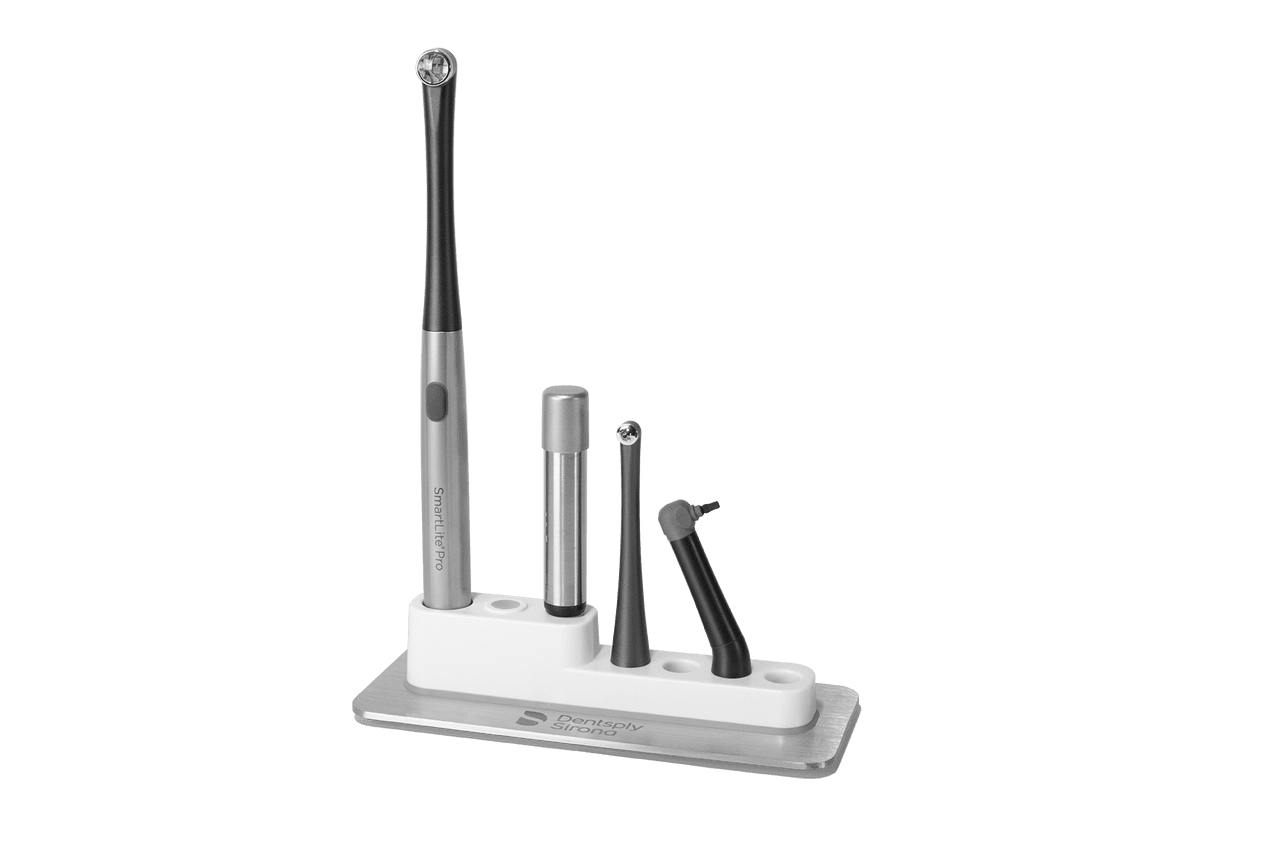
- Sleek charging station equipped with holding ports for the pen, batteries and modular tips.
- Medical-grade stainless steel pen for long-lasting durability year after year.
- 360-degree swivel apparatus to gain perfect access at any angle in the mouth.
- Modular, interchangeable tips for a variety of clinical indications and future advancements.
- Built-in radiometer to ensure the appropriate curing energy for a reliable cure.
SmartLite® Pro is also equipped with dual batteries so you never run out of power, ever. Batteries are using the latest generation LiFePO4 battery technology.
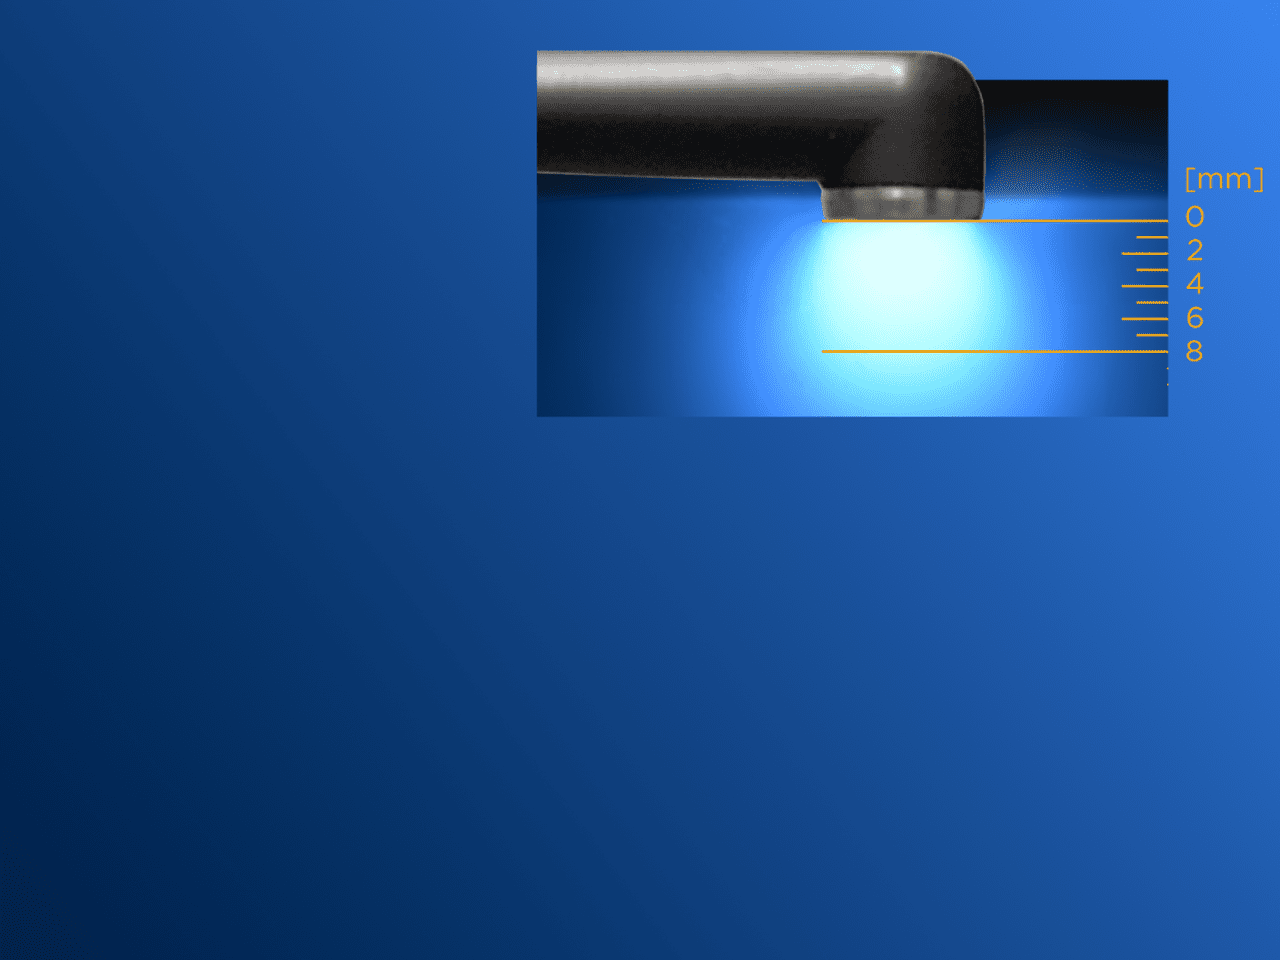
Curing Diameter
The large 10 mm active curing diameter covers bigger restorations combined with an excellent beam collimation for reliable curing even over larger distances.
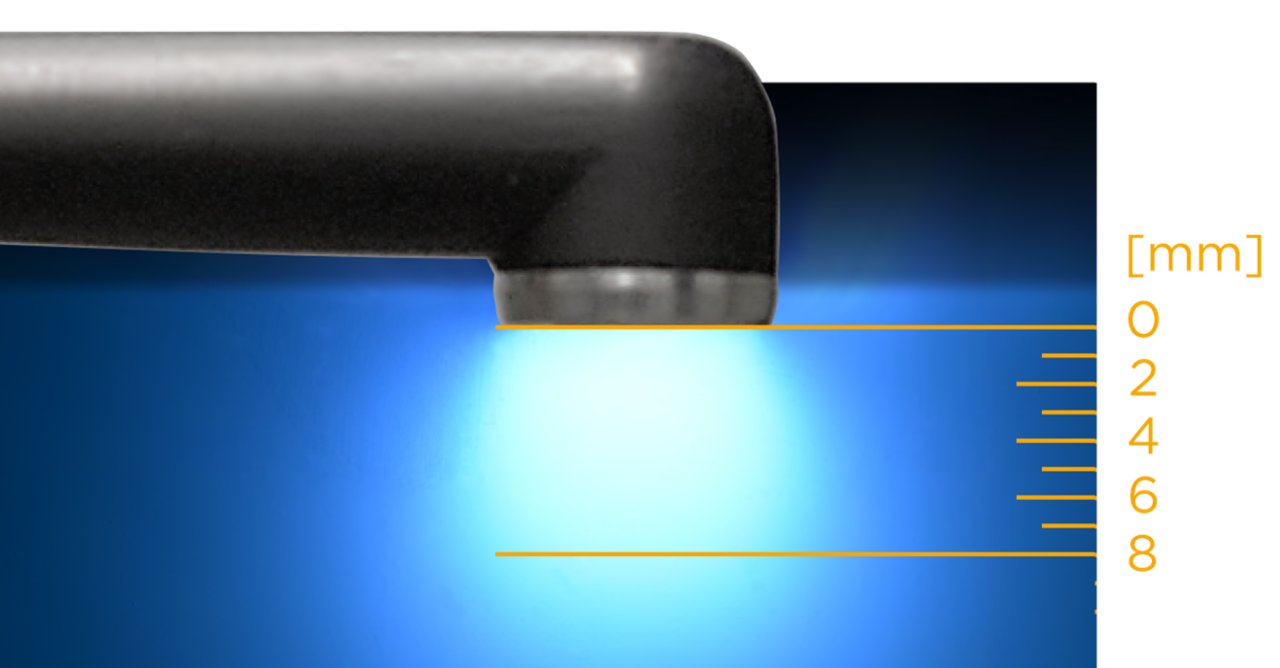
Irradiance
The optimized 4 LED design provides a homogeneous light distribution over the entire curing area. SmartLite® Pro delivers an average irradiance of 1250 mW/cm2. The beam profiles of 4 lights show the distribution of light emitted across the light tips.1
.")
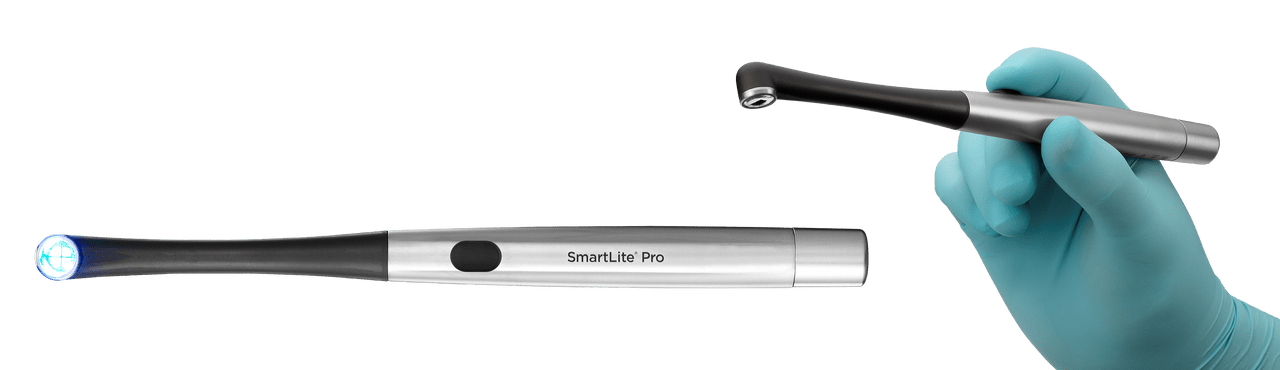
Pen-style design
Remarkable pen-style design that feels balanced in the hand and beautiful in its details.
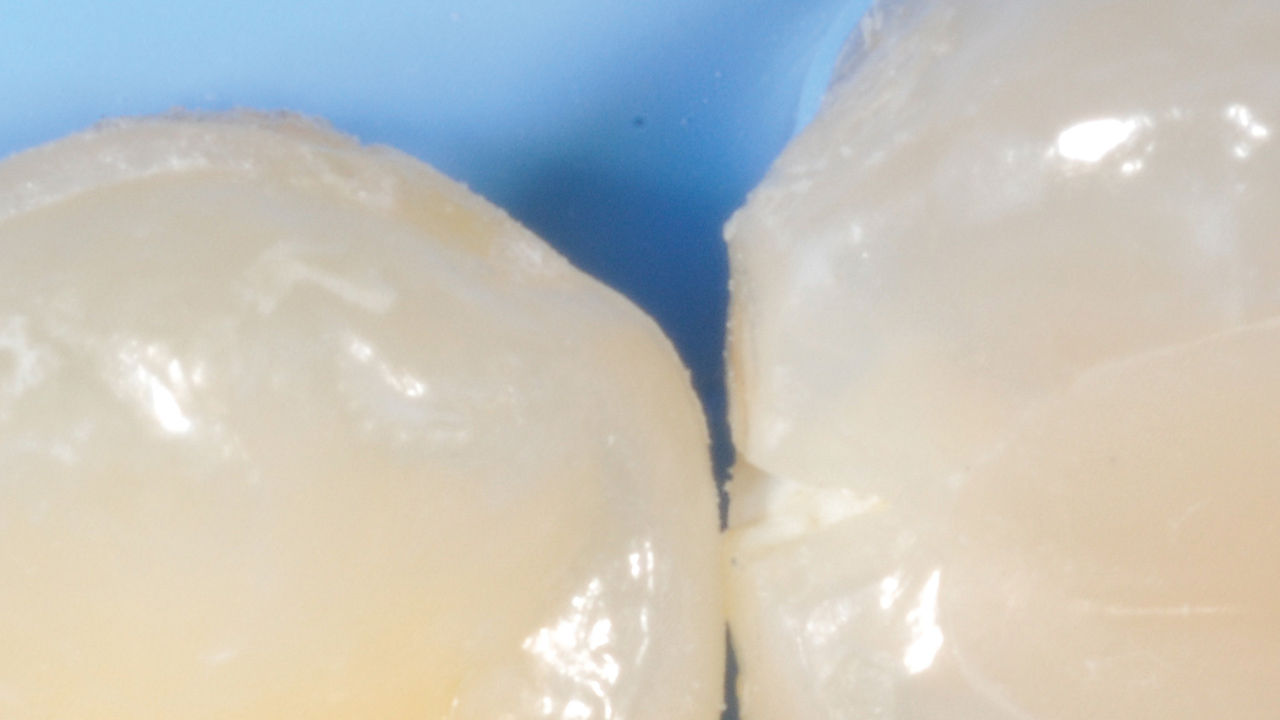
Transillumination
The Transillumination Tip is a diagnostic aid that helps visualize interproximal caries, evaluate cracked teeth and illuminate endodontic access. Its sophisticated design includes a 1 mm focused light output with two different settings (anterior and posterior).
Left image: Visual Inspection
Right image: Transillumination

SmartLite Pro EndoActivator™ Attachment
Designed for multi-directional movement, the SmartLite Pro EndoActivator™ uses elliptical motion and increased energy for effective irrigant activation. Activating irrigant solution produces a surface with more opened dentinal tubules, providing better obturation of lateral and accessory canals.2
Left image: Treated with SmartLite Pro EndoActivator™
Right image: Untreated


Best Practices for Light Curing
What makes a good curing light and how can SmartLite® Pro help to achieve more predictable high-quality results?
Curing technique
In a recent study using new curing lights to test the ability of dental professionals to deliver energy to simulated restorations, there was a 10x difference in energy delivery between the best and worst operator.3 The variable is technique! Choosing a curing light with a lightweight, ergonomic design for stable positioning and simple controls for consistency of use across operators may help reduce the opportunity for technique variability.
Curing angle
The light guide tip should be as close as possible and flat against the restorative surface to have the best chance of directing light to all corners of the proximal box. Angled light guides can make it difficult to keep the surface of the light tip flat at the restoration, especially in the posterior, where 74% of direct restorations are performed.4,5 Pen-style lights make it easier to maintain the proper curing angle when space is an issue—such as the back of the mouth, and in geriatric and pediatric cases.
Curing distance
When the proximal box is over 6mm deep, dentists often find themselves guessing if the adhesive and composite have been sufficiently cured. Be sure the curing light cures to clinically relevant distances versus higher output power.
Testimonial
"Brilliantly designed modular light with excellent curing capability and additional transillumination capacity that sets it above all other lights in the market."
Dr. A. Babul, Canada
SmartLite® Pro
Modular LED Curing Light
The quick connect, 360-degree rotational tips leverage the power of ergonomics and simplicity to accommodate a variety of clinical indications:
- Low-profile curing tip for excellent clinical access using a collimated light beam and a large 10mm active curing area.
- Transillumination tip to diagnose interproximal caries and cracked teeth or visualize endodontic access. Its sophisticated design includes a 1mm focused light output to optimize your diagnostic efficiency and to identify problems unseen to the naked eye.
- SmartLite Pro EndoActivator™ Attachment. Designed for multi-directional movement, the SmartLite Pro EndoActivator™ uses elliptical motion and increased energy for effective irrigant activation.
Downloads
FAQs
For many dentists, light curing is an undervalued part of any restorative procedure. They assume when they see blue light coming out of the curing light, all is good and their work is done. However, just because blue light is coming out does not mean the curing light is working effectively. And if the curing light is not working effectively, the restorative material will be left under cured esp. in deep cavities or bulk fill situations. Studies have shown that inadequate polymerization can contribute to a variety of clinical conditions such as discoloration, pulpal irritation, post-operative sensitivity and eventual failure of the restoration. It’s more than just ensuring light is coming out. It is also the light intensity, wavelength, exposure duration, size, location, and orientation of the tip to the restoration.
- Use "blue blocking" glasses or shields (orange colored).
- Inspect the light guide tip for any contaminants or damage to the surface.
- Surface barriers can decrease energy delivered.
- Reposition the patient for access to light curing and to see the light tip.
- Stabilize the light when curing.
- Adjust the position of the light guide to achieve proximity of the light guide to the surface of the tooth being restored.
- The tip should be perpendicular to the tooth surface being restored.
- The light output should be as close as possible to the restoration (within 1 mm).
- Follow the light exposure times and increment thickness recommended by the resin manufacturer, making allowances if you use another manufacturer's light. Increase your curing times for increased distances or darker or opaque shades.
- Air cool the tooth when exposing for longer times, or when using high-output LCU's.
When the light energy is not well distributed across the light tip, there are areas of hot and cold spots which can lead to inconsistent curing throughout the restoration. The “hot spot” areas in the center sometimes provide extremely high irradiance, but the “cold spot” areas on the edges often barely deliver sufficient energy to cure the restoration. This leads to a non-uniform cure across the restoration. That’s why a uniform beam profile is important.
The SmartLite® Pro is a unique modular curing device in a remarkable, all-metal housing. Modern optics provide leading quality of cure for reliable outcomes. And the modular concept with exchangeable tips makes it possibly one of the most versatile dental instruments:
• The Cure Tip with the optimized 4-LED design provides a homogeneous light distribution over the entire curing area.
• The additional Transillumination Tip is a diagnostic aid that helps to locate crown fractures, anterior and posterior caries and can be used as a light source for endodontic procedures.
• The EndoActivator attachment offers multi-directional movement for effective irrigant activation.
The SmartLite® Pro Modular LED Curing Light offers numerous advantages making it possibly one of the most versatile dental instruments:
• Modern optics for reliable clinical outcomes
• Lage 10mm active curing diameter to cover bigger restorations
• Optimized 4-LED design provides a homogeneous light distribution
• Modular design for clinical versatility
• Transillumination tip as diagnostic aid
• EndoActivator attachment for effective irrigant activation
• Remarkable, all-metal housing
The SmartLite® Pro curing light is designed for light curing of dental materials at a wavelength of 450-480nm.
The additional PolyCure tip is designed to cure restorative dental materials at a wavelength of 405-480nm.
The SmartLite® Pro Modular LED Curing Light offers numerous advantages making it possibly one of the most versatile dental instruments:
• Modern optics for reliable clinical outcomes
• Large 10mm active curing diameter to cover bigger restorations
• Optimized 4-LED design provides a homogeneous light distribution
• Modular design for clinical versatility
• Transillumination tip as diagnostic aid
• EndoActivator attachment for effective irrigant activation
• Remarkable, all-metal housing
Hygiene and maintenance requirements for the SmartLite® Pro Modular LED Curing Light are described in the Instructions for Use (IFU). You can find the IFU on the Dentsply Sirona website: www.dentsplysirona.com/ifu.
Related Content
Discover more with SmartLite® Pro
Class II Approach
Increase efficiency and predictability for more consistent, successful clinical outcomes.
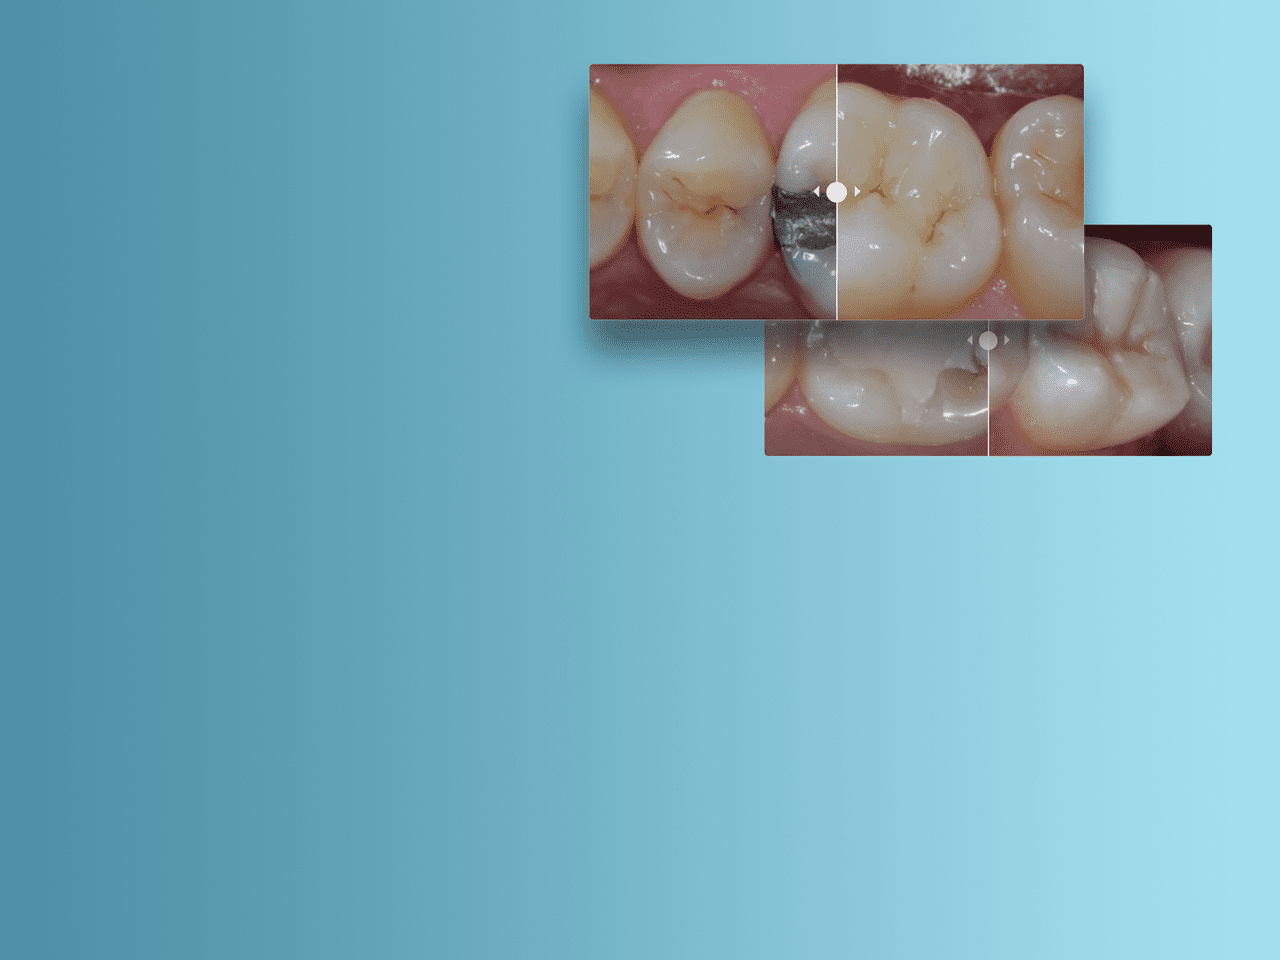
Class II Clinical Cases
Dentsply Sirona provides the tools and techniques necessary for patient satisfaction and procedure success.
Class II – Depth of Cure
Factors affecting depth of cure and how to consistently achieve thorough light curing of composites.
- R. Price (2019). Unpublished commissioned study, data on fi le. For more information, contact Consumables-Data-Requests@dentsplysirona.com
- Kanter V, Weldon E, Nair U, et al. A quantitative and qualitative analysis of ultrasonic versus sonic endodontic systems on canal cleanliness and obturation. Oral Surg Oral Med Oral Pathol Oral Radiol Endod. 2011;112(6):809-813.doi:10.1016/j.tripleo. 2011.06.002
- Price and Felix IADR 2010. Barcelona #467 Quantifying Light Energy Delivered to a Class I Restoration
- Price R., Felix C., (2010). Factors Affecting the Energy Delivered to Simulated Class I and Class V Preparations. JCDA Applied Research.
- American Dental Association Procedure Recap Report (2006). For more information, contact Consumables-Data-Requests@dentsplysirona.com
